
 |
 |
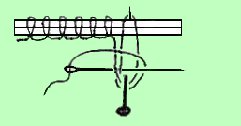
These picots are worked by inserting a pin into the backing fabric the length of the required picot away from the cordonnet.
Bring the working thread down around the pin and back over and under the cordonnet and back to where the pin enters the fabric.
The cordonnet should now have three threads leading from it to the pin.
Buttonhole stitch over of the threads for the first stitch and then buttonhole over all three back down to the cordonnet.
If required, a bead could be positioned at the end of the picot with the needle passing through it on both passes.
This bead would then stop the buttonhole stitches from dropping off the end of the picot.
Using a ring stick, a pencil, a knitting needle or piece of dowelling of the desired
thickness,
wind the thread around it for at least 20 or so times according to how fat you wish the couronne to be.
Work buttonhole stitches over the threads with the needle between the threads and the ring stick (or whatever you are using).
Work around until the threads are completely covered with the buttonhole stitches and slip off the stick.
If you find that the couronne is too fat or too thin, don't throw it away - save it, because if may be just the one you want for another project.
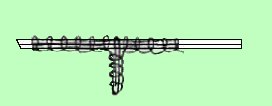
These couronnes can also be worked over the central vein of a leaf or to embellish an
edging,(as illustrated below) by laying the ring stick over the cordonnet and,
with a
needle, winding as many threads as necessary
around both the ring stick and the cordonnet.
Complete as above.


FINISHING YOUR LACE
Once all the filling stitches have been worked on the surface only of the work, lay 2 or 3 or more loose threads over the couched Cordonnet or framework threads - these will provide a smooth base for the closely placed buttonhole stitches worked over the Cordonnet to cover the untidy edges of the filled areas. The number of threads used will determine how much of a sculptured, 3-D look is created. This finishing line of buttonhole stitches is called the cordonnette.Start the cordonnette at A and work through to B on each petal in order, finishing with the centre of the flower and catching the ends of the threads inside the buttonhole stitches as you work the cordonnette.
When all the buttonhole stitches, or cordonette, have been completed, pull the two pieces of calico apart and cut all the stitches you can see between the layers of the fabric and remove the piece of lace from the pattern. You will find that there are now numerous tiny pieces of loose thread across the back of the lace which will need to be removed - a pair of tweezers is very good for this tedious job.
There you are- your first piece of lace.
I would appreciate any feedback on the clarity-or otherwise-of these instructions.
Closing this window will take you back to the page with my Guestbook and E-mail
links.
Thank you.